Tech

Using ChatGPT to refactor a web site's manu structure

I used ChatGPT last weekend to help us revise the menu structures on our coho’s internal web site. I wrote out a detailed prompt, and then entered every page title on its own line, about 35-45 in total. In my prompt, I told ChatGPT to merge page topics, to rephrase them so they make sense to a less-technical audience, and to provide three examples of hierarchical menu structures, with at least one restricted to two levels.

We were pleasantly surprised by the outcome. Some of the AI’s groupings didn’t make sense, but many of them did. Using ChatGPT kept us from having to spend hours and hours on this exercise. Editing the AI’s work, recognizing what was good and what needed rethinking or special considerations, was much easier than doing it all ourselves.

We’re busy with other coho duties and our $dayjobs; I’m all for using a tool that gets us to the finish line quicker with less pain.

Fewer podcasts, more quiet

I remember way back in the ’90s, meeting with a great nutritionist who was also a great therapist. At the time I listened to lots of Audible.com books and shows. She advised me at the time to reduce that input. “You like to mull things over,” she said. [1]

When podcasts came along, I gorged myself and have done for many years. I listened to them doing the dishes, working outside, walking, puttering around the house, etc. The margins of my day needed to be filled with something, put to use, and listening to podcasts helped me feel I was doing something productive with that otherwise unused time.

However, I have more than once over the past years heard a whisper underneath all the noise: Get rid of them. Go quiet.

This usually led to me pruning my feeds, reducing the number of podcasts in my queue, and so on. But, like stubborn belly fat, the episodes continued to accumulate over time and never went away.

But I heard that whisper more frequently of late. I decided my word of the year would be SPACE: more spaciousness in my schedule and more spaciousness in my head. So I decided to take more drastic action on my aural inputs.

In Castro, I deleted all the podcasts in my “later” queue and reduced the number of active podcasts in my current queue to about 25. I’m in no hurry to work through them.

I unsubscribed from many podcasts; I still keep a few that I really like because I do enjoy listening to something while I wash the dishes or vacuum. I select not just what I listen to, but when and where I listen. [2]

If I really want to hear something, it’s easy to find that specific episode and download it. And Castro makes it easy for me to upload audio files and listen to them easily.

I am finding myself in the quiet a little more, and I don’t miss the chatter. I have also not been plagued with the FOMO, a devil imp if ever there was one.


[1] The irony of my overconsuming junk food for the body and junk food for the mind is not lost on me.

[2] As I also do to control my eating.

Alan Jacobs writes a bit about his read-it-later strategy, one I also subscribe to. I throw things into Pocket but never read it; it simply scratches a hoarder’s itch to save something without the consequences of dealing with it. (Same with my Amazon wishlists; they’re parking places for items I hardly ever think about again.)

The best read-it-later app for me is Mailist. I have it send a daily email with a single link from my pile of read-it-later links. I like the randomness of not knowing what will arrive, and it’s always interesting to see what interested past-Mike that has no interest at all for present-Mike.

Lessons Learned on Maintaining our Cohousing Community’s Newsletter

We got several compliments on the Dec 2022 newsletter I did for our Bull City Commons Cohousing community.

So I thought I’d put down here a few things that I do and a few lessons learned along the way. This post may be helpful to cohousing or other communities wanting to start their own newsletter.

I’ve been writing the Bull City Commons Cohousing newsletter since December 2019 or thereabouts when I took over from the former editor. You can see the newsletter’s evolution on our newsletter archives page.

Mailchimp

A former community member started the newsletter on Mailchimp. Because we’re always economizing, we use the free tier that has just enough functionality to get you going, but with the fancier tools (such as AI-powered scheduling of mailings) always out of reach.

Mailchimp is powerful and highly customizable, but it, like many online products and services in this age, is geared to the needs of commerce, business, online selling, and full-on marketing. As such, it’s got an arsenal of tools like audience segmentation and A/B testing that experienced marketers know how to manipulate. As a result, its interface can be forbidding and intimidating.

It’s true that BCC’s early years were dedicated to marketing and selling units. But because we were at the free tier—and because we were civilians doing this in our spare time after the rigors of the $DAYJOB—no one knew how to learn or how to leverage Mailchimp’s formidable firepower.

And while Mailchimp’s interface offers several templates and ways to get started designing a newsletter, it took several issues to learn the basics. For example, pictures spanning the whole width of the design needed to be resized on my Mac to 564px before importing into Mailchimp, or 264px if they were half-width. Mailchimp has a way to resize pictures in its own interface but I found it too arcane and frightening to use; I often found myself cropping an image instead of resizing it.

I’m not ashamed to say I paid for Paul Jarvis’ Chimp Essentials course so I could come to grips with Mailchimp. It was very helpful in explaining to me the basics so I could grok the Mailchimp concepts of audiences, campaigns, all sorts of stuff. (Jarvis sold the course to others and it exists now on Udemy as Mailchimp For Newbies: A Complete Mailchimp Course. Still worthwhile, I think, if you want to get a fast head start.)

In retrospect, all we needed was a database where people could easily subscribe or unsubscribe, a way to schedule the publication, and a way to design and assemble a simple newsletter with words and pictures. Mailchimp was over-engineered for our simple purposes.

Were I to start a newsletter today, I’d probably go with a simpler system like Buttondown or Substack if they had a free tier of service or a low annual cost.

Wix web site

I believe the same former community member who signed us up for the Mailchimp signed us up for a Wix web site.

The original pages were functional and looked very homemade. A few years ago, a few of our design-savvy members did a total overhaul of the site and today it looks great.

As far as the interface: none of the online web-building sites are easy to use if you’re a newbie (I’ve used Squarespace also, and it has its own quirks), and Wix is no different. Adapting to any of these platforms them takes time to understand how it works. It’s like how you need to spend time playing a game to understand its physics and rules so that you can both leverage and subvert them; it takes time and a lot of playing around.

When I took over the newsletter, I knew I wanted to leverage the web site. I saw the newsletter as a light, more mobile news delivery system, while the website could hold longer articles, bigger photos, etc. My early newsletter issues included the first few paragraphs of a longer story that was continued with a “Read more on the web site” link.

With the redesign, we included a real blog. I use the blog heavily and try as often as possible to link from the newsletter to individual blog posts.

Someone in our group suggested we go to Wordpress to save $$$ but that would be a mistake in my view. When I had a WP blog on my own server, I was always having to deal with Wordpress security issues. Also, to make Wordpress useful, you need to add extensions and plugins; the more of those you add, the slower the site runs and I think loses some stability, as well.

By contrast, right out of the box, Wix includes a blog, photo galleries, ability to upload video files, and more. One of the Wix features we use extensively is its Events functionality. We can create an event, users can RSVP, they get an automated email thanking them for the reservation, and then receive another automated reminder email three days before the event.

You could maybe do all that in WordPress but it would take time to figure out, time to research if it’s even possible, time to make it work, time to maintain it, and so on. There comes a point where you have to ask yourself how much your time is worth. For that reason alone, Wix is worth about $250/yr.

Also, for whatever reason, Wix is not a hacker target the way Wordpress is. Or at least Wix does a very good job of making their site secure and handling the security so that we don’t have to worry about that.

For us, Wix has a good set of features that saves us time, so it’s worth the cost as our website is our brochure to the world and potential members.

There are other site-building tools, of course, like Weebly, but I don’t have experience with them; there are scads of systems out there.

The December 2022 Newsletter

The innovation with this edition of the newsletter is that it’s composed entirely of squibs and summaries that link out to all the stories on the blog. So all I needed to do to assemble the newsletter was link out to specific blog posts.

Previously, the blog was either not there or I was delinquent in updating it, so the newsletters always had original stories and pix, sometimes long stories, etc. I didn’t mind that too much, as I wanted the newsletter subscribers to get something a little extra that the blog readers did not get.

But that meant the newsletters sometimes were way too long and became a bit of a slog to read. Stories are OK being long on the blog, though, which means the newsletter can be more streamlined than before. Hit the Page Down key, and you see photos and short blocks of text, making the experience more visually pleasing. From a user’s perspective, they can skim through the newsletter, get a sense of the whole without needing to read too much, and it’s only 2 or 3 screens long. If they want to delve deeper on a specific story, they can choose to click the link and read about it; if they don’t, they can easily skip it.

I subscribe to a lot of newsletters and totally swiped this layout from one of those. The streamlined design meant I was able to compile this edition in about 90 minutes. In the old days, pre-blog, it would usually take me 6-10 hours to create the newsletter because i’d be writing stories, searching for pictures, etc. all at the same time. Writing blog posts still takes time, but it’s 1-2 hours per story spread out over a month or two, instead of all banged up together into a single weekend.

Because I’m always procrastinating, the fewer decisions I have to make, the better. For that reason, I tend to accept the Mailchimp design defaults for fonts, etc. I could specify those things if I was really anal about it, but I’m not. I simply duplicate the previous newsletter in Mailchimp, and re-use the text and image blocks for the next one.

And anyway, Mailchimp designs are supposedly built to look good on laptop, tablet, and phone, so the less I specify about the design the better it probably looks. (Wix layouts also support multiple devices.)

One of Mailchimp’s integrations I take advantage of is publishing the newsletter to BCC’s Facebook page on publication. I don’t know if Buttondown or Substack do that, but it’s handy when trying to propagate the newsletter to larger audiences.

A Final Caveat

I would add that, if you do set up a newsletter/web site for your community, be prepared to be The One who will always be responsible for it. I happen to be technically savvy, which is handy, but I’m also now the unelected historian/reporter for our community. It’s unlikely I’ll ever be able to hand off the newsletter and blog duties to anyone else.

Timecube

When I’m actively working heads-down on a project, such as writing a newsletter or doing some tech workon the laptop, I set my timecube for 60 minutes. It reminds me to get up, walk around, and maybe get some fresh ideas on whatever problem I’m trying to solve.

When I’m not actively working on anything and am just cherry-picking tasks or winging it, I set the timecube for 60 minutes to remind me to get up, walk around, and not get lost in my head and in the internet.

Lessons Learned: Creating a slideshow in iMovie

Background

Our community held an appreciation evening for our architects and Durham Central Park Cohousing, whose members mentored us through the journey.

During the planning, someone suggested having a slideshow play in kiosk mode on the TV in the multipurpose room while the party went on in the adjacent Common Dining Room.

And of course, all heads turned to me since I’m the de facto publicity guy who drafts the BCC blog and the (now quarterly) newsletter.

My Approach

When given this task about a month and a half before, I of course procrastinated. Well, not all the time; I was quite busy at the $DAYJOB and with other BCC and personal assignments that creating this show was not priority. I also trusted my inner guidance to let me know what to do and when I needed to do it.

But one still needs to make decisions early on, don’t one? They help to give one a place to start and to set up some useful constraints. Starting with the end in mind, I decided on the following:

  • Keep the show to about 20-30 minutes.
  • No music or other soundtrack, because there would be so much talking and other music playing in the other room.
  • The show would be a blend of still photos and drone footage taken of the construction in progress.
  • It seemed to me the simplest way to compile the photos would be to put them in chronological order; therefore, every photo needed to be accompanied by the month and year the picture was taken. I thought people looking at the pictures would want to know when they were taken.
  • The show (either a movie or a PowerPoint slideshow or some other mechanism) had to play on my MacBook connected via HDMI to the TV.
  • The show would be broken into three main pieces: pre-construction, construction, and then move-in on up to the present day. Even during construction we were having events—such as the beam-signing—so I thought those pictures could be interleaved with the constructions at the appropriate moments in the timeline.

What I Actually Created

An iMovie video slideshow that lasted almost 40 minutes. All photos were watermarked with the image’s creation month and year. The video got good reviews from the folks who saw it, and it brought back some good memories. But it was way too long.

Processing the Images

Did I say I started too late? I started too late.

We had two large stores of image files on our shared Google Drive: one set devoted to construction, one to community events. Fortunately, they were arranged in folders—and sometimes sub-sub-folders—by date. Google Drive is too slow to click and move through, so I tried downloading the folders via my browser, but there were inevitable hiccups with some corrupted files, internet burps, and whatnot.

  • At that point, I searched out and found Cyberduck, which offered a fast and simple way to download those folders to my MacBook.

Now I had lots of folders and subfolders of images. I did not want to have to traverse all those folders; instead, I wanted a single folder with all the pre-construction images, a single folder with all the construction images, and a single folder with all the post-construction images.

  • I searched around and—I still can’t believe this—found exactly what I needed: a MacWorld article from 2011  defining an Automator workflow that moved files out of subfolders to a parent folder, and then deleted the empty subfolders.
  • I selectively used that Automator workflow to pull all those nested files up into a single directory for each category of images I had defined.

Now to process those images: sort them by name? By creation date? How to ensure I’m seeing all the files in the right order?

  • I prefer sorting by name; it just makes things easier all around, especially if I was going to do more post-processing of the files later. Or inserting other images I might find later so they fitted into their chronologically right place.
  • Much searching and trying out of programs led me to PhotoMill, which performed brilliantly.
    • The key first step after ingesting the photos, was to select them all and then select File > File Attributes > Set Creation/Modification Date from Capture Date… This added the necessary metadata to the images for the next step.
    • I created a preset workflow within PhotoMill that changed all the formats—a mix of JPG, PNG, and HEIC—to JPG, renamed all the files to start with each image’s creation date and time in the format YYYY-MM-DD HH:MM, followed by the original filename, and then added the creation Month and Year in a 50% opaque white font in the lower right corner of each image, as shown here.

With a folder of images renamed, sorted, and formatted the way I wanted, all that was left was to … sift.

Because I did not have a detailed outline in mind, and because I wanted to let the materials lead me to where they wanted to go, I felt the only thing to do was to sift through all those images to make a first cut.

So for about an hour or so every day, I sorted through about 3,800 image files. Most were quickly consigned to the Trash.

I totaled the numbers of files I had. If each image lasted 4 seconds on screen, then 4 times the number of files and divided by 60 would tell me how many minutes the show would last. That first cut got me to about 60 minutes, so I knew I had lots more cutting to do.

Creating the Video Slideshow

As I sifted through the files again, I hit on the idea of calling the video “Timelines.” I decided to keep the construction images and event images separate, but staying with the pre-construction and post-construction eras. So there would be smaller timelines playing within the larger timeline narrative. I also decided to stop the show after our celebratory gala in May, after the move-ins had finished and we were ready to enjoy our accomplishment.

During that second round of culling, I created new subfolders for the images and began investigating how to present them. After looking at PowerPoint and other kiosk/slideshow programs, the simplest and most powerful tool to use was iMovie.

I consulted a MacMost video course on iMovie I’d bought a while back to educate myself for another project. Gary very helpfully had several videos dealing with my specific use case, and he refreshed my memory on applying transitions, titles, and other niceties. Using iMovie also let me easily drop in some MP4 and MOV drone videos captured during some of our events and during construction.

We were now at, oh, a day before the event? I reported that I’d have a really good first draft, and figured I’d have most of Saturday to get it mostly good.

Renaming the files as I had done meant that, as I dropped in batches of files, they sorted into the sequence I wanted. Adding the drone videos was also dead easy. And iMovie let me know how long the video was, so I could do more drastic cutting as needed. I had iMovie render low quality videos I used to review what would be the final product.

The MacBook Pro’s M1 processor made very short work of the video creation; on my old iMac, it would have taken maybe 90 minutes. I was so happy I got the Pro.

The video wound up at about 40 minutes, still about 20 minutes too long. I did some cutting and moving chunks around, but did not have a better creative idea to support such a drastic cut. Had I arrived at this point a week earlier, a better idea would have appeared.

What I Would Have Done Differently

  • I could have eschewed watermarking all the photos in favor of using titles or other iMovie captioning. But then, I’d have still had to reference each image’s creation date to get that info correct. So, six of one…
  • I would have foregone sifting through 3,800 images. My process, for better or worse, is to sort through everything. I did find a few great shots that way, but that effort was over the top. As Liz noted, whenever people were not in the pictures, the air went out of the show.
  • In the next draft of this video, I will trim the 15-20 minutes of boring construction photos. Since I named the video “Timelines”, I will instead create more mini-narratives showing the progress, say, of the hallways and the lobby from studs to sheet rock to paint. Those will tell more meaningful stories within the larger construction narrative, and the impact will be greater to see 2 years’ progress on a defined space within the span of a few photos.

Resources

From Launchbar to Alfred

I had a long and happy partnership with Launchbar on my iMac. But when I started using my MacBook Pro more intensively recently, and found that Spotlight wasn’t doing everything I wanted, I found that Launchbar has been languishing with hardly any updates, to the consternation of its fans who love its look and operation.

So I turned to Alfred and am really enjoying it. The community and forum are active (unlike Launchbar’s), there are many great tutorials and Youtube videos on setting it up and using its workflows, and I am very much enjoying playing with it. Which is the main thing.

Digital declutter

In searching the web for tips and clues on how others organize their digital files, I ran across this video from Caitlin’s Corner: DIGITAL DECLUTTER | organizing my files, email & hard drives - YouTube.

For whatever reason, watching her dig through her piles of old digital files lit a fire under me to do the same. Her method is a bit Marie Kando: open every file, even if only briefly, consider it, then keep or delete.

I think what inspired me (beyond simple procrastination on my latest project) was her commitment to the job. Her video time-jumps from the morning, when she starts, to late at night when she finally stops looking through at least one of her hard drives. I could see myself doing the same thing. The idea of letting go of this digital baggage, and finally making the decisions I have been putting off, also inspired me.

I started last night with my Google Drive files, of which I did not have many. I’m now viewing GDrive as a temporary holding area for files in progress or for collaboration. I decided that my MacBook Pro and Dropbox would be the FInal Source of Truth for all my files. So the GDrive files I kept are now sitting in my Downloads folder, which I will get to cleaning out … soon.

How I’m reading books these days

Trinity College Library 1900

6 Breathtaking Libraries

Library Extension for Firefox/Chrome/Edge

Firefox remains my browser of choice on my MacBook mainly because of Library Extension, which does not work in Safari. With this extension, I can go to a book page on Amazon or Audible and see whether the book is available either physically or digitally via the Durham NC public library 

Books, Ebooks, Audiobooks

Both ebooks and audiobooks are available via my library credentials from the library’s own site, Overdrive/Libby (via the Libby app), and Hoopladigital (via the Hoopla app). Checking out an ebook from the library itself delivers it to my Kindle Oasis or Kindle app.

One of the great bonuses of Overdrive/Libby is its access to magazines; Liz loves reading The New Yorker this way on her iPad mini.

Hoopla delivers not only ebooks, but audiobooks, music, and a limited selection of movies/TV series. What continues to astonish me with Hoopla is its deep selection of comics and graphic novels; before buying a graphic novel from Amazon/Comixology, I check Hoopla first and am usually pleasantly surprised. Its comics reader is not as good as Comixology’s, but it’s decent.

I’m an Audible guy, and have been since the late ‘90s; it’s mostly reliable and offers lots of stuff. I’ve used Apple’s Books app now and then, but did not care for the experience. I have an app on my iPhone called Bound Audiobook Player that is useful for playing audiobook files I’ve ripped or created from other sources. And I’ve written before about using Audiobook Builder for “binding” separate MP3 files into consolidated audiobook files.

Devices & Apps for Reading

I have a Kindle Oasis that I am finding myself using less and less. I appreciate that its lighting is probably better on my eyes than the iPad’s, and that it offers only reading with no other app or online distractions, but it feels increasingly clunky to use.

On my iPad, I configure the Kindle app so that I can scroll through a book like a web page (when that is supported) rather than tapping on the side of the screen to advance to the next page. I like to read with my glasses off in the evening, so I can make the font size quite large on the display while still displaying a lot of text.

This article led me to seriously consider reading Kindle books on my iPhone. And it’s actually a pretty good experience, once I’ve adjusted the font and scrolling. I find myself now opening the Kindle rather than a browser when I am fiddling with the phone.

I rarely use Apple’s Books app for anything beyond PDFs, though I have bought a few items from its store that were not available via Amazon. I always forget about the Books app. The ability to organize and manage my collection is limited, though the Kindle’s is really not that much better.

Lately, for “classic” books, I’ve been using the Serial Reader app and am loving it without really knowing why. It delivers chunks of a book daily that can be read in 10-15 minutes; sipping a book rather than gulping it, as it were. I paid for the app so I could load an EPUB book from Gutenberg, and it handled the ebook flawlessly. Right now, I’m reading a book of Wodehouse short stories.

One problem with so many apps and devices is: read the same book on multiple devices? Read different books on different devices? What type of reading works best with each device? How many books can I read at a time without overwhelming myself? I’m still working that out.

Comics Sites & Apps

Comixology remains my favorite comics reader, despite how Amazon has wrenched its UI into a confusing mess to match the Kindle app’s equally frustrating UI. The Comixology reader can only read comics purchased or borrowed from Comixology. Many pixels have been spilled on how Amazon has ruined the Comixology web and digital experience, and the criticism is justified; attempting to discover new work on Amazon’s Comixology sub-site is next to impossible; still, the Comixology app's comics-reading engine is the best and easiest to use.

Again, check out Hoopla’s deep catalog of comics, including many recent releases. Don’t buy from Comixology if you can borrow from Hoopla.

I check the Humble Bundle site once a month for its book bundles; the bundles are priced so that portions of what you pay go to both charity and the publisher. Most of the book bundles typically deal with programming or gaming, though they sometimes have fiction themes or instructional themes (how-to-write books during NaNoWriMo, for example). They also usually have at least one comics bundle. For a relatively small price, you can sometimes get a couple of dozen (or more) comics/graphic novels in a themed bundle. Some of the themed collections I’ve bought include a Keiron Gillen & Jamie McKelvie Showcase, Ed Brubaker’s Image Comics work (his incredible Criminal series), and titles from One Press and Top Shelf; these bundles helped me catch up on lots of titles I had missed.

The Humble Bundle comics can be downloaded in multiple formats (PDF, CBZ, CBR) though that isn’t consistent; occasionally only one or two formats are offered. I prefer to read these on my iPad. There are many many comics readers out there; I’ve used Chunky Comics Reader for so long on my iPad that I can’t get used to other readers. Chunky is still available and works great, but the last update was 2 years ago, so it’s probably abandonware, alas. A good second choice to try is the Panels comic reader, which is being actively developed.

I’ve tried both the Marvel and DC comics readers; Marvel’s reader is better, but neither are all that great. The main advantage of these services is getting access to nearly the complete catalog offered by each publisher (new issues are delayed by six months, typically). Both services offer monthly and yearly subscriptions; I like paying for one on a monthly basis till I finish reading through whatever is interesting to me, then stopping that subscription and moving to the other. 

Good Lord

Until I wrote this post, I had no idea how convoluted my reading life had become! But it’s not that hard in practice, I think. I use my iPad for most reading: comics, Kindle app, and Serial Reader. On my iPhone, I also have Serial Reader (it syncs progress across all devices, or at least is supposed to), and Kindle (for light non-fiction that is skimmed more than read). 

And yes, I have a chair and lamp reserved for reading good old-fashioned papery codex books. Books are a proven technology that never go out of style. 

Is plain text best?

CJ Chilvers gently disputes the claim of text files as the best future-proof archival medium.

There’s no magic file format. Most are likely to last long enough for you to convert to something else if need be. It’s more important to find the constraint that works for you…

I wouldn’t worry too much about your archive, though. Nothing digital is of archival quality. There hasn’t been enough time to test any format or storage method.

One of the peculiarities of archival research is that most paper has survived by accident. That’s how durable paper can be. Nowadays, archivists know exactly how to store paper; they know the temperature, humidity, pressure, etc. needed to preserve books, documents, etc. so it can last for a hundred or more years.

But digital media? Forget it. That whole area of preservation is constantly in flux and few archival standards have emerged – apart from maybe PDF-A – to ensure that even this web site will last for the next 20 years. Storage media, file formats, shifting standards, popular uptake: they all play a part.

I agree with Chilvers: old email, PDFs, and Word files work just fine for me, and for most people as well. I also count Evernote, which I’ve been using for 10+ years. Using rich text format (RTF) to capture formatting, bulleted and numbered lists, and images makes note-taking and note-making a more pleasurable and useful process.

Very few things will last forever. If they can last long enough to be of use to us, then that’s long enough.

Rediscovered a great Evernote keyboard combo that v10 recently added back in: press Ctrl+Alt+v to create a new note from the clipboard.

Etaoin Shrdlu

Etaoin Shrdlu is a somewhat infamous phrase among language enthusiasts. It is pronounced “eh-tay-oh-in shird-loo” and is believed to be the twelve most common letters in English, in order of most frequently used to least frequently used. The expression came about from linotype typesetting machines. Were one to run a finger down the first and then second left-hand vertical banks of six keys on a linotype machine, it would produce the words etaoin shrdlu. Linotype machines were sometimes tested in this manner. Once in a while, a careless linotype machine operator would fail to throw his test lines away, and that phrase would mysteriously show up in published material. The full sequence is etaoin shrdlu cmfgyp wbvkxj qz.

Source

Creating a PDF with clickable hyperlinks from a Word 365 file

We’re having trouble creating a PDF with clickable hyperlinks from a Word 365 file. We want to create a PDF with clickable headings in the table of contents, clickable hyperlinks, ckickable cross-references, etc.

Neither Save as PDF nor Exporting to PDF did the trick, though the resulting PDF did have clickable bookmarks in the side pane. Which is OK but not great, and not what we wanted.

Turns out that you need Adobe Acrobat to create a PDF with clickable hyperlinks from a Word file. (I have PDF utilities on my iMac that could do this, probably, but we need this operation to work on a Windows laptop.)

The hackity-hacky-hack way around this situation is to do this:

  1. Upload the Word file to Google Drive.
  2. Open the Word file in Google Docs.
  3. Download the file as a PDF.

We don’t get the bookmarks capability with the resulting PDF, but the hyperlinks work and the Word formatting is unaffected.

Solution grabbed from the last post in this Microsoft support thread.

And I leave the final word to the writer of that support message:

Now the question is, why am i spending xxxxx money for using Office business when it cannot perform an operation as simple as maintaining functioning hyperlinks after a PDF conversion? (When) a simple (free) software such as Docs (Pages for Mac works too) can perform the same operation without any problem? To me, this remains a mystery.

Doug's AppleScripts: Preserve a Genius Shuffle Playlist

My Apple Music app 1 has 12,000+ tracks, many of which I’ll bet I’ve not heard in a long time. To help reacquaint me with my own collection, I use the Genius Shuffle feature.

Doug Adams, maestro of the essential Doug’s Applescripts for Music, TV, and iTunes, also likes the Genius Shuffle feature in the iTunes and Music apps. If you like Shuffle’s on-the-fly assortment of tracks, his AppleScript code lets you save the tracks to a playlist.

Doug explains how to copy the code into the Script Editor and where to save the script so you can use it.

IMPORTANT: In macOS 10.15 and later, you will need to replace “iTunes” in the code with “Music”.

His code automatically names the playlist “Genius Shuffle.” Doug prefaces that name with the music style or genre – “70’s Funk - Genius Shuffle”, for example. I prefer to preface mine with the playlist’s first track, so “Kathy’s Waltz - Genius Shuffle.” And then I move it to a Genius Playlists folder.

If you spend way too much time lovingly curating your collection of ripped and downloaded music, then get to know Doug’s scripts.

Related links:

  • Apple Support page on Genius Playlists and Genius Shuffle
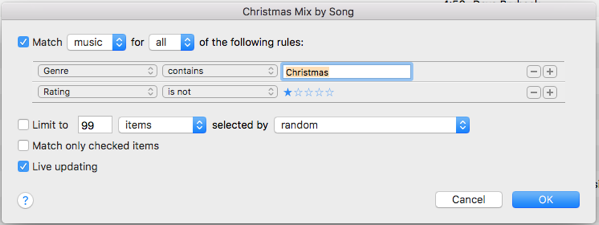
  • Doug has a great page of Missing Menu Commands: “…a list (a very subjective list) of scripts that perform tasks you may wish were actual iTunes, Music or TV Menu commands”. The “Preserve a Genius Shuffle Playlist” is not among them and deserves to be. Of that list, I use “Open iTunes Script Folder” as a quick way to open a Finder window to the Script folder. “Toggle Checkmarks of Selected” is what I use to deselect all my Christmas tracks so they don’t appear in Genius Shuffle or other non-holiday playlists.

  1. Why, oh why did they get rid of the perfectly good “iTunes” name to go with the blander “Music”? When I’m Googling to troubleshoot issues with the app, I get too many false positives with Apple’s music-streaming service. Infuriating. ↩︎

Update on my Libib.com graphic novels library

I have been using Libib.com intensively the last several weeks to scan in my graphic novels. I have gone full-nerd on ensuring better cover images are in place, even for books I know I will be shedding.

My Libib.com graphic novel library totals 210 books right now – didn’t know I had that many! The bar-code scanning goes well most of the time, but direct market or older books (25 years+) don’t scan in well, so I manually enter the ISBN and that usually works a treat.

As with many collectors, when I processed a pile of books I was surprised to see things I’d bought and intended to read one day but never did. The classic rubric for getting rid of something is forgetting you had it, yes? It is ruthlessly efficient. But it is not as strong in me as the delight in discovering a book that is ripe for rediscovery.

There are some other graphic novels/comics lovers in our community who would like to plunder the collection; we’re talking about maybe having a lending library bookshelf or three stationed on the various floors of our building. We’ll see.

I’ll likely go through and keep the stuff I really want to tend, find digital equivalents if they exist, and then export a CSV of the rest and shop it around to local comics shops to see if anyone is interested. I’m discovering old editions of things that are listed for rather high prices on Amazon and Ebay, though whether they see for those amounts is a data point for another day. I know that I don’t want to get into the business of being an online bookseller; I’d rather find a good home for the collection where others can enjoy them.

Replacing Otter transcription with Word 365 Online

When I was a reporter, one of the most tedious jobs I had was transcribing my interviews from a handheld cassette recorder. The only way to make the chore a little easier was to use a Radio Shack foot pedal to start and stop the recording. Still, transcribing a 2-hour interview would take at least twice as many hours.

I find that I still have a use for transcribing audio, whether for the interviews I do for the Bull City Commons newsletter or for random podcasts and recordings where I want to keep a specific quote or passage in Evernote.

Thank the Lord for automatic transcription, surely one of the good things that AI has wrought. No more foot pedals!

I was quite happy using Otter.ai, but I maxed out the free tier recently and needed an alternative. I did not want to pay a large subscription fee for an occasional service.

In searching for alternatives I was surprised to discover an automated transcription feature in Microsoft Word 365 online, which I already subscribe to. If you have an Office 365 subscription, then you have access to this really neat feature. (The transcribe feature is for the online version of Word only, not the desktop app. You can dictate into the desktop app, but it cannot transcribe an audio file.)

As the Microsoft support page says:

The transcribe feature converts speech to a text transcript with each speaker individually separated. After your conversation, interview, or meeting, you can revisit parts of the recording by playing back the timestamped audio and edit the transcription to make corrections. You can save the full transcript as a Word document or insert snippets of it into existing documents.

I used Word’s transcription feature recently to transcribe the audio from a Zoom interview with two other people, and also a 90-minute online conference with about six different speakers. The transcription was excellent, certainly on a par with Otter if not a little better. Highly recommended if you need this niche service.

Using DVD Player to play ripped .dvdmedia contents

I use RipIt to rip DVDs to my hard drive. Depending on the DVD, I will tell RipIt to create an MP4 of the movie or contents or I’ll use Handbrake to process the ripped contents. 1

Ripping a DVD to the Mac creates a .dvdmedia file, which is actually a set of subdirectories packaged to look like a file.

DVD Player, though, does not like to play a .dvdmedia file. My usual workaround was to use VLC Player, an open-source video viewing utility that is serviceable, but crashes at the least provocation.

Lots of searching on this issue uncovered the following interesting facts:

  • Although the DVD Player app is not in the Applications folder, it is still on the Mac, albeit well-hidden in System/Library/CoreServices/Applications. (Other apps in this folder include Archive Utility, Wireless Diagnostics, Network Utility, and a few others.)
  • You can make an alias of the DVD Player app and put it in your Applications folder or – more convenient – use Spotlight to call it up.
  • There is, in fact, a way to make DVD Player open and play ripped media.

Thanks to a comment on a years-old Apple discussion thread, here’s the procedure:

  1. In Finder, right-click on the .dvdmedia file and select Show Package Contents.
  2. Select and copy the VIDEO_TS folder.
  3. Elsewhere on your drive, create a new folder with the same name as the .dvdmedia file. (Not necessary, but may help lessen confusion.)
  4. In the new folder, paste the VIDEO_TS folder.
  5. Open DVD Player.
  6. Within DVD Player, navigate to and open the VIDEO_TS folder you just pasted.

The video should play just fine in DVD Player. You can delete the original .dvdmedia file.


  1. In RipIt, select the Compress button to create both a compressed playable file and a .dvdmedia file. ↩︎

Update Microsoft apps using the Mac App Store

I have been using Microsoft Word since the early ’90s when it was a DOS-based application. There are areas of the application I never use – mail merge, drawing tools, creating bibliographies.

But there are others I’ve used so heavily I dare call myself expert with them: styles, templates, macros. I’ve been using Word for literally decades to draft large user guides and documents of all kinds, and I continue to collect macro code snippets to help me create products in my $DAYJOB where Microsoft Office is the standard.

In my Bull City Commons Cohousing work, most everyone has used the Microsoft Office products in their previous work lives, so Word, Excel, and PowerPoint still have a place in my toolkit.

As a result, I subscribe to Microsoft Office 365. For a long time, I purchased the products directly from Microsoft and Office’s updater application would check for updates and download them. But the app had the eerie habit of interrupting me with an update notification when I was most busy and its operation became quite erratic: it would tell me there was an update but wouldn’t download it!

I can’t remember where I saw this tip – I think a MacMost video – but the workaround was to delete the Office apps from my hard drive and instead install them through the Mac App Store.

The Mac App Store now handles all the updating chores for me. It works more quietly and efficiently than Office’s own updater app, and it’s a more Mac-like experience. The Mac App Store shows me which apps need updating, their sizes, and I can easily start the update before I go to bed, since they tend to be huge files that clog my bandwidth.

Libib for cataloging books, DVDs, and CDs

As part of my downsizing, I’ve looked at the shelves of graphic novels and wondered how I could quickly create a list of them. In case I want to sell them or even give them away, I’d like to be able to hand over a list of what I have so people know what they’re getting, or so a buyer can tell me what they’re most interested in.

Of course, I thought, “There’s an app for that.”

I’m not sure why I spent hours today searching for and trying out apps to scan a book or DVD’s barcode to generate a list quickly and easily. But my intuition said to do it, so I did.

All I wanted was…

All I wanted was an app that I could use to scan the barcodes of books and DVDs, match those barcodes to book and DVD names, and then export the list. And ideally, they’d be easy to use without me puzzling over settings or help pages. (No fear there: only one or two of these apps even had support pages or FAQs, however skimpy.)

My first path was incorrect: I searched for iOS-based barcode scanners and this created a whole morning and afternoon spent reading app reviews, downloading and testing a few apps, and generally just being displeased with the whole exercise. These tend to be consumer-level price-finding apps. The apps tend to be adware, or buggy, or just generally difficult to work with.

After stepping away for a bit, I hit on the second path: look for book cataloging apps, or cataloging apps that could do books and DVDs – and why not CDs, while I’m at it.

After more Googling, I found Libib, which was the answer to my dreams.

Libib did all I wanted…

Libib has two components: 1) a mobile app that can scan barcodes and 2) a website where those entries can be tagged, metadata entered or edited, etc. For personal use, the app and site are free at Standard level; if you’re a small library, there is a Pro level with more admin features.

Libib can show you the entire contents of all the libraries you have created, or only the library you select. Libib offers four types of libraries you can create: Books, Movies, Video Games, and Music. I assume that each library type is associated with its own set of catalogs or custom searches, which improves the speed of the barcode matching.

On the web site, I created two libraries: Graphic Novels and DVDs. I downloaded and logged in to the iOS app on my iPhone. And then I picked a few DVDs for testing.

My tests worked great. The iOS app read barcodes and returned product info as fast as the camera took the picture – and MUCH faster than any of the barcode-scanning apps. Refreshing the web site showed those entries on my DVDs Library page. (That may not sound like a big deal to you, but so many of the apps I tried today lacked such basic competence in design and function that I almost cried with joy to find something simple that simply WORKED AS EXPECTED.)

I eventually found the Export capability: from your account page, select Settings, select the Libraries tab, select Export Library (.csv), and then the library you want to export. I was impressed by the amount of metadata included with the DVDs; and it’s probably possible to customize the metadata further.

What’s to love?

What I love about Libib – the site and the app – is the speed, the cleanness of design, proper Support pages so I can troubleshoot problems myself, and its own general soundness and sanity.

There are social functions that I don’t care at all about and don’t see myself using, but that’s fine. Libib does what I want, as I expect it to, and I am now – at long last – looking forward to cleaning out those shelves of graphic novels.

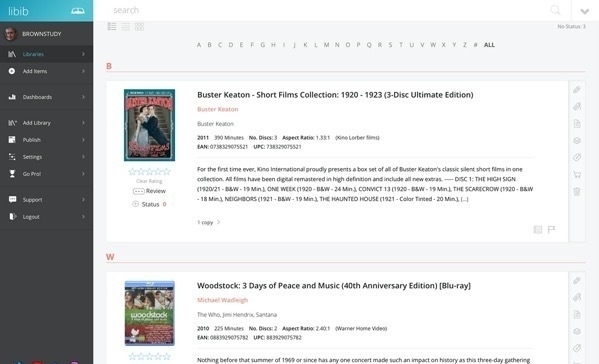
Libib _One of the nice touches of the Libib interface is the ability to view your library's items in a plain list view, as large icons, or a hybrid view, as shown here, with full description and metadata on the DVDs._
Clone wars

While spending a few evenings this week diagnosing the problem with Disk Utility not erasing my external hard disk, I also searched the Carbon Copy Cloner site for clues.

During those latter searches, I found this MacMost video on why cloning is a poor choice as a backup strategy.

Gary’s point is a valid one: cloning your disk should not be one’s sole backup strategy. Although CCC can certainly do incremental backups, that is not its strength. He outlines three cases where a cloned drive can be helpful, but by and large he is against the use of cloned drives. He prefers a mix of Time Machine backups and cloud backups.

Gary fields lots of offended comments on that page from folks who don’t share his faith in Time Machine backups (they do fail and act capriciously; it’s happened to me). Anecdotes are shared on how a cloned hard drive enabled folks to recover from disk failures in less time than using Time Machine.

I’ve always tried to be a good little boy when it comes to computer backups. I have:

  • Time Capsule backing up the whole drive
  • Backblaze backing up our individual user directories
  • Carbon Copy Cloner’s weekly incremental backup in case of disk failure
  • Dropbox backing up my user directory, photos, music, etc.

Up to now, I’ve not thought of this as overkill. My iMac is the center of my computing universe; I sync my iPad and iPhone regularly. Although my wife has an iPad, she only syncs it to the iMac twice a year: to put on or take off her Christmas music.

Still, Gary’s strong statements in the comments that cloned drives really aren’t needed made me review my choices. I can only think of two times when I’ve needed backups:

  1. I upgraded the hard drive on my old MacBook. I used Time Machine to basically restore my old files and setups to the new disk.
  2. My MacBook and Liz’s laptop were stolen in a burglary. At the time, we used Crashplan and Dropbox to restore our key documents. When I bought the iMac a little while later, I can’t remember if I restored the old Time Machine backups or just started fresh; probably the latter.

A cloned drive would have been nice, I suppose, but wasn’t really necessary in these cases, I think. Time Machine worked just fine, as I recall.

As of now, I’m OK with my backup strategy. I do have things backed up to CCC, such as iMovie projects, that I have not bothered to upload to Dropbox or Backblaze; they’re simply too huge to push through our tiny internet connection. I view my cloned hard drive as insurance, something I carry while hoping I never need it. I am happy now to go back to ignoring my automated backups as they chatter in the background.

Fixing Disk Utility error -69877

Carbon Copy Cloner’s weekly backup task broke after my iMac’s upgrade to Catalina recently. I followed these instructions from CCC to reformat the external drive as APFS but Disk Utility kept crapping out with error “-69877: couldn’t open device.”

I tried different compatible formats but Disk Utility resolutely refused to reformat the disk.

Many searches for -69877 solutions yielded people who recorded numerous reformats, reinstalls, etc. I held off taking the complicated solutions seriously, though; I particularly ignored the worst-case solution: junk the disk. I figured if I kept looking, some stray sentence somewhere would ring my bell.

And it did. In one of many forum discussions about -69877 on the Apple site, I found this gem:

Sometimes when Disk Utility gets stuck like this for me, I choose a PC format to initialize the HDD then reformat with the Mac settings. So after you give it a name, click the first pull-down menu and select MS-DOS (FAT), then click the second pull-down menu and select Master Boot Record. Go ahead with the reformat. When it completes, just re-format again with the Mac settings.

I reformatted the drive as MS-DOS (FAT) and Disk Utility erased the entire drive. Success!

I was then able to follow the CCC directions to select APFS and create the CCC partition and an extra partition I want to use for storing large files.

Syncing third-party calendars from Google to iOS

I center my email and calendar activities around Gmail and Google Calendar. They feed the Mail and Calendar programs and apps I use on my iMac, iPhone, and iPad.

I’ve encountered the following issue a few times: a new calendar I’ve added or imported into Google Calendar does not appear on my iOS/iPadOS calendars.

Most recently, it was importing the ICS link from my workplace’s Outlook Web app into GCal. I could see my workplace schedule on my Google Calendar but not on my other devices.

Troubleshooting this was maddening. I’ve selected the right calendars in Google, the calendar connections to my iMac and iDevices look fine – why am I not seeing what I KNOW should be there?

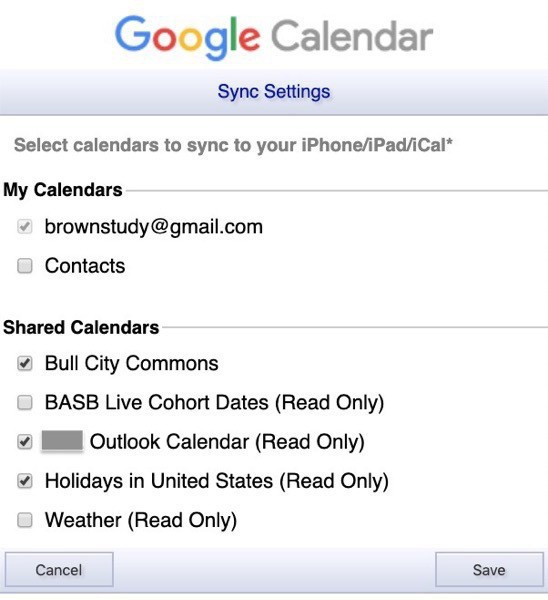
I found the answer in this 2015 blog post from Online Tech Tips. The writer correctly pinpoints the problem to third-party calendars that show up under Other calendars.

And he identifies the solution – a specific link that “for some ridiculous reason…does not appear anywhere on any page while in Google Calendar…However, this page is key to getting those other calendars to show up in the Apple calendar app.":

[https://calendar.google.com/calendar/syncselect](https://calendar.google.com/calendar/syncselect)

Google calendar sync

And indeed – my workplace calendar was unselected in the list. Ticking the box, clicking Save, and checking my iPhone later showed that the new calendar was now there.

File this under “yet another 20-second solution that took two hours to find.”

I needed a keyboard shortcut in Evernote to duplicate a note. I was about to load Keyboard Maestro to do that when I remembered the Keyboard System Preference panel. Presto! So easy to forget the built-in tools sometimes.

Forbes's "Should You Upgrade iOS" column

If one lesson can be learnt by all this it is to stop blindly leaping to every new iOS release.

Gordon Kelly is a frequent critic of Apple so I have always taken his iOS update reports with a grain or three of salt. But with the recent 13.x releases, I now wish I’d listened to him and held fast to iOS 12.

My SE, which usually held a good battery charge all day, drains down to 5% within an hour simply sitting on my desk.

My SE is 2+ years old so, on the off-chance, I’m having a new battery installed this week. If I still see a drain, I’ll know it’s iOS.

I have turned off automatic updates and am holding fast, for better and worse, at 13.2.1.

Update, 2019-11-13: Took my iPhone to an Apple certified service shop. The repair guy hooked my phone up to his diagnostic computer and it said the battery had gone through 600 recharge cycles; Apple says the battery has a lifetime of 500 cycles. So yeah, the battery was shot. The Battery Health setting is an OK criteria (mine was at 88%) but not the decisive one; it’s the number of cycles that is decisive. But the user cannot see the number of recharge cycles a battery has gone through, only a technician. Charging the phone up now; hoping for good times ahead.